Press Release : Holo-Buildings Editor Tutorial
- Earth2 Press Release
- Sep 23, 2021
- 11 min read
Earth2 has released a note for introducing the Holo-Buildings editor. We loved how comprehensive it is. Please check it out before you start your HoloBuilding journey.
Reproduced below as available on earth2.io
INTRODUCTION
What is a Blueprint?
A Blueprint is a design or technical drawing created by a player which has been saved and includes one or more virtual HoloBuildings. By owning a specific blueprint, you can create, edit, position and place it on your property.
If you are the creator or if you own the full rights to a created blueprint, you will be able to sell your blueprint to other players who will in turn have the right to place that blueprint design on their properties or use it inside Earth 2.
What is a HoloBuilding?
A HoloBuilding is the resulting product of a Blueprint which has been activated, constructed then placed on a Property. Amongst other things, HoloBuildings serve aesthetical and practical purpose inside Earth 2 - feel free to learn more here.
What is a Property?
A Property is a parcel of land owned by a player on Earth 2. The Editor allows you to search for Properties you own when placing or building new Blueprint.
What is Space?
Space is the volume of a HoloBuilding which is stored inside the Editor. When placing new HoloBuildings on your Tiles, Space is generated and becomes part of every HoloBuilding. It can be utilized for various purposes such as storing resources, additional Essence, convertible Space volume toward Phase 3 structures and more.
If a player retrospectively decides to remove or reduce the volume of a HoloBuilding after it is placed on a property, part of the volumetric will be credited to their Space virtual wallet and will become available for subsequent HoloBuildings or other purposes yet to be disclosed.
Opening the Editor
To open the Editor and start building your first HoloBuilding visit your profile’sHoloBuilding Editor page. To do that, first open the drop-down user menu at the top right of your screen by clicking on your name/avatar, then click HoloBuilding Editor. This will open the editor view.

You can choose the preferred view by selecting one of the buttons in the top left corner of the editor. Currently, you can choose between Map View and Satellite View. The 3D (3 axes) button activates and deactivates 3D navigation.
Additionally, a Map Search bar will allow you to search for Locations, and Properties (Tiles you own).

You can move the map around by navigating while holding down the left mouse button.
Searching For Locations
With the editor open, select Create my first Blueprint from the menu to the right. If you already have one or more Blueprints, click the button at the bottom of the right menu “Create new Blueprint”.

A window will appear asking for the Property you would like to build the Blueprint.

Typing a location into the text box, the system will prompt you for all the matching results from which you can then select.

Selecting a Property by clicking on Select Property, the Editor will teleport you to it and an outlined grid will appear defining limits and dimensions of the selected Property.
Please note that you cannot create new Buildings (and so, place Blueprints) on Properties listed for sale!
The Red Border indicates a building area restriction for your property beyond which you are not allowed to build. This to prevent secondary owners' buildings to be built attached to yours.
We are considering future plans for Properties in Megacities to not have that limitation and for roads to be placed between Tiles.

If you would like to build a Blueprint without taking a Property as a reference, you can always select Continue Without: an open space of 7,5 km2 will be available for you to express your creativity!
Navigating in the Editor
The editor is ready, and you will now be able to create your first HoloBuilding.
In the lower left-hand corner, you will find buttons to zoom in and out of the map. Please note that you need to be zoomed in to grid level in order to use the editor. The Lock function activates by default locking the current view but you can also unlock it by deactivating the lock icon

Additionally, while building with the 3D Navigation active, hold the right click mouse button and move around to rotate the view (or hold Shift + arrow keys) and hold the left click mouse button to travel around (or use arrow keys).
You can easily return to this guide by selecting the Help icon in the bottom right of the editor. The two arrows pointing to the left and right, allow you to undo or redo previous actions, if available from the current session.

Drawing Modes
The Editor offers three main Drawing Modes: Add Blueprint, Draw Polygon and Draw Rectangle. During this document section we will first introduce the 2nd and 3rd Drawing Mode.

To draw any polygon shape:
Left click the 2nd button or press 1 from your keyboard.
Left click once on the map on a place where you want a corner of your building to be (do not hold the mouse button). The editor will create what is called a vertex: a point that will stay attached to your mouse cursor via a line. Click a second time to create another vertex.
Keep clicking to place more vertices with the intention of creating a shape to your liking. If you have at least 3 vertices, you can close the polygon. To do so, left click on the last placed vertex or the first one.
Note that if you draw an invalid polygon (a polygon that intersects itself) the process cancels. To exit the drawing mode you can also press “esc” (escape) on your keyboard.
Additionally, you can draw a perfectly shaped rectangle by clicking the 3rd button or pressing 2 from your keyboard. Left click once on the map to start drawing, then move the mouse and you will see the rectangle being created under your mouse. Left click again to finish the drawing when the shape is to your liking.

Editing Modes
Editing Modes are modes with which you can edit an existing polygon in a certain way. There are three Editing Modes:
Polygon Selection (S key)
Polygon Editing (E key)
Polygon Scaling & Rotating (R key)
If a polygon is not selected (white colored), you cannot edit it in any way. In order to select it, click on it. In order to return back to Selection Mode from any other mode, press the “S key”.
You can always deselect a blueprint by clicking into an empty space on the map or by pressing Escape. This also works for cancelling drawing.

When a polygon is selected, you can modify its Height and Elevation in the right menu and then Save or Discard.
You will be able to change the Blueprint’s name at anytime from the Blueprint’s information right menu.
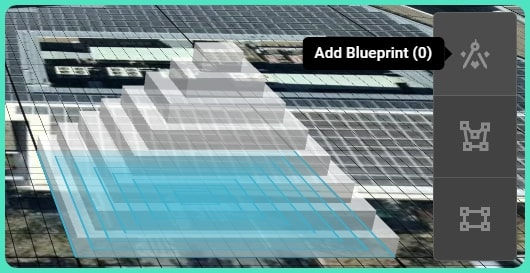
Height and Elevation entries are in meters, 2 decimal places are possible, so you’re able to define the height and elevation down to a centimeter. Elevation will define the height the body will be elevated above the ground. This does not mean you can create floating buildings, but you can stack blocks. This allows you to create more complex buildings with parts not directly connected to the ground themselves like this one:

You can move a polygon around by Left-clicking it, holding the mouse button and moving it around. On release of the mouse button the blueprint will be placed at the current position of the mouse. It usually snaps to grid which you can avoid by keeping the Shift key pressed during the placement.
Selection Mode can be used to select multiple Polygons together. You can Shift + Click to select/deselect features one by one, or you can Shift + Drag (left mouse button) to select everything under the drawn selection rectangle.
Note that you can move selected features together, but you cannot edit them together.
You can Edit a polygon by pressing E on your keyboard.

If you are not satisfied with the general shape of your building, you can edit single vertices in this mode. Just click on one vertex, hold the mouse button and move the vertex into the right position. Then release the mouse button. Repeat as often as you like.
If you need more vertices in a certain area for a more complex shape, just click on one of the yellow dots, and the neighboring lines will show new vertices.
You can select multiple vertices via Shift + Left click and drag them together; selected vertices will appear red colored.
While dragging a Blueprint, the snap-to-grid option is active to better guide the user while repositioning it. You can always disable this function by holding Shift.
In order to delete vertices, select those you want to delete and then click the Deletebutton, the Del key or Backspace.
You can Scale & Rotate a polygon by pressing R on your keyboard.
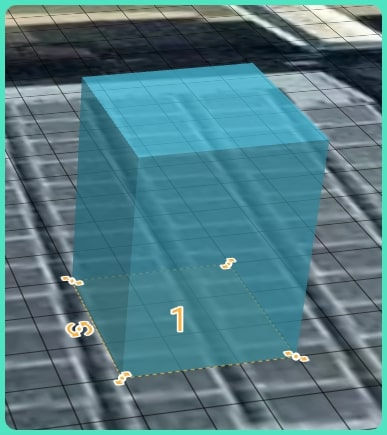
To scale the blueprint you can click on one of the vertices and increase or decrease the building to your liking.
In order to rotate it, just click on the yellow rotation symbol (here left of the floorplan) and rotate it around the center of the blueprint.
Pressing R key again will change the pivots for scaling and rotating between Center Pivot and Opposite Vertex. You can change the Rotation mode as many times as needed always by pressing R on your keyboard.
The rules for snapping to grid apply of course.
Editing Tools
First, let’s select two or more HoloBuildings together by holding Shiftand Left clicking one by one.

The Editing Tools are now available, in order:
Unify (Ctrl + U)
Difference (Ctrl + D)
Intersect (Ctrl + I)
Match Borders (Ctrl + M)
Clone (Ctrl + C)
Delete (Del)
Unification, Difference and Intersection depend on the selection order! Whichever operation is chosen from this range, it will be applied to 1st and 2nd selected features, the result of that will be applied with 3rd selected feature, the result of that will be applied to the 4th selected and so on…
The algorithm checks if the operation can be applied, if it cannot, it will stop. An example, if HoloBuilding 1 & 2 can be intersected but HoloBuilding 2 & 3 cannot, the process will stop at the 2nd HoloBuilding and will nor proceed any further.
Unification: will combine two or more selected and overlapping polygons into one.
Difference: The part of polygon 1 that does not overlap with polygon 2 remains. Shapes 2, 3, 4,… are used to cut into shape 1. Hint: placing a “shape 2” completely within “shape 1” and selecting both of them (order does not matter in this particular case) will create a hole in “shape 1”.
Intersection: keeps only the overlapping area of 2 shapes
.
Match Borders: is a smart way to change polygons so they perfectly fit together without unifying them. Selection doesn’t matter, it makes sure that shapes are nicely glued together without overlapping. It does not remove shapes, it only edits them.
Cloning: copies the selected polygons and places the copy into the same place (which turns everything red, since now the clone and the original overlap). You can easily drag the clone to another place and do with it whatever you could do with the original.
Note that you can place Blueprints over different Blueprints. To do so, select Edit from an existing Blueprint and then select the Add Blueprint icon. Once done, click Save.
Blueprint Information
On the right side you find a dark grey rectangle, containing some important information. Right now it looks quite empty, but once you have created a few blueprints it will show them as a list.
In the top you can find a section containing information about the Blueprint you are currently working on. You can enter a name for the Blueprint here, check the number of polygons used, Property (is previously selected), total vertices, the total volume, and the amount of E-Dollars “E$“ this volume would cost you to deploy.

Once you are satisfied with your Blueprint you can Save it at the bottom right with the save button. Don’t forget to give the Blueprint a unique name!
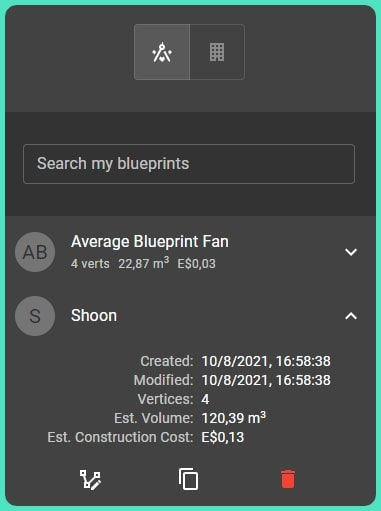
Saved Blueprints will appear in the list of Blueprints on the right side of the screen. In the Search my Blueprints field you can enter the text to filter your Blueprints.
Note that only those Blueprints built on a previously defined Property will have the “Tiles Icon” displayed under the name.

Clicking on an existing Blueprint will open its window menu reporting useful information such as creation date, polygons, vertices, volume and more.
You will also find the choice to Edit the Blueprint, to Clone or to Delete it.
Blueprint Errors
If a Blueprint shows a Red point in the list to the right, or polygons turn Red on the map overview, that means one or more values require attention and you will be unable to construct the building in the future in its current state. There are a couple of reasons for the Red points:
Polygons intersect
Polygon bodies don't have a path to ground: they need to touch the ground themselves or connect with other polygons that eventually touch the ground
Polygons exceed size or max number of vertices
Polygons reach across the border of the building area
All of these cases can be solved by either merging the polygons, scaling them or moving them.
Adding Blueprints to a Property
If you want to place an already existing Blueprint on a Property, follow these steps:
Select Create New Blueprint at the bottom of the right menu.
Search for the desired Property.
Confirm by clicking Select Property.
The Editor is now ready and positioned in the selected Property. Click Add Blueprint or press “0” from your keyboard.

A new window will appear asking you for the Blueprint name you would like to position in the selected Property; the system will prompt you for all the matching results from which you can then select.

Select the desired Blueprint, additional information will be displayed.

Blueprints already linked to a Location, can be linked to new Locations: Blueprints selected during this process will not be overwritten or deleted.
Click Select Blueprint, the window will disappear and you will now be able to place the Blueprint in the desired position. Once done, click Save Blueprint from the bottom right menu. You can later delete Blueprints not anymore needed.
Creating Your First Building
As defined at the beginning of this document, a Building is a Blueprint becoming “reality”! Visible to other players, it can only be placed on your Properties.
Placing a Building will follow with a Construction Cost, information you can read after selecting a Blueprint from the right menu.
To create your first, visible Building, select Create My First Building.

A window will appear prompting you to select a Property. Selecting a Property is necessary and essential since our Buildings need to be placed on our Tiles.

Typing a location into the text box, the system will prompt you for all the matching results from which you can then select. Choose the preferred location; the editor will teleport you to the map position while displaying the size of the property as well as other useful information.

Placing Your First Building
Now that the editor is ready, we can place an already existing Blueprint on the grid, to do so click Add Blueprint or press “0” from your keyboard.

A new window will appear asking you for the Blueprint name you would like to position in the selected Property; the system will prompt you for all the matching results from which you can then select.
Note that only blueprints that are validated (and so, with no invalid geometry) are allowed to be placed.

Select the desired Blueprint, additional information will be displayed.

You can place more than one Blueprint by repeating the previously explained passages as many times as you want. The Construction Cost to the right will be the total of all Construction Costs for those HoloBuildings currently placed on the Property.

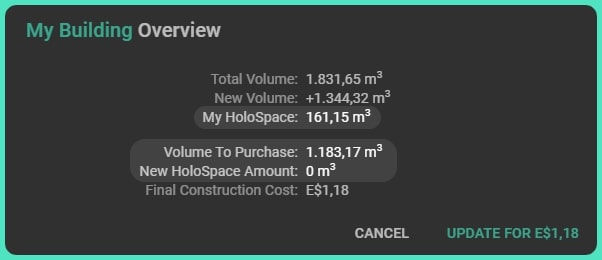
When done, select Place Building. A new window will appear:My Building Overview. Here you can check all the details before confirming and so transforming the placed Blueprints into Buildings. Note that placing Buildings will not delete any of the Blueprints you own.

The Final Construction Cost will be substracted from you Earth 2 Account Balance. You always will be able to edit or delete your Buildings from the right menu of the Editor.

Space: Editing or Deleting Buildings
You can always update or delete your Buildings. To do so, visit the My Buildings tab and select the Building you would like to edit.
When reducing the volume of the already-placed Building, updating it will refund you by the 90% of the initial purchased Space which will be always available for future Buildings you are going to place.

Instead, when increasing a Building’s size, the system will first check for Space left to be used.

We aware that in order to prevent scams attempts you cannot edit or delete buildings from Properties listed for sale.
The Grid
As you may have already noticed, the Grid shows small squares as well as bigger ones, these last outlined by bold segments.
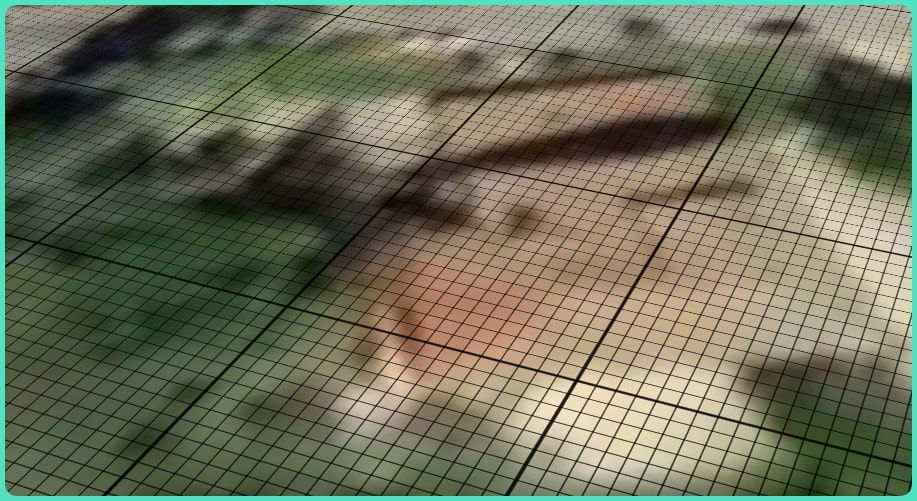
The small squares indicate the 1x1 meter meanwhile, the bigger ones, define the actual tiles you are already familiar with and so, those displayed in the Grid View when exiting the HoloBuilding Editor.
Because of the curvature of the Earth, some tiles may be bigger or smaller than 10x10 meters. However, this detail does not effect what you will visually see on the map after placing your HoloBuildings and so, after crating your Buildings.
The HoloBuildings' volume may vary as well due to the Earth’s curvature but this does not interfere with the final result displayed on the map.
E2News would suggest everyone to try their hands on the editor, the interface is really simple. Unleash your creativity!

Comments